Getting Started with OutWit Hub
Important Note: The tutorials you will find on this blog may become outdated with new versions of the program. We have now added a series of built-in tutorials in the application which are accessible from the Help menu.
You should run these to discover the Hub.
Here is an introduction tutorial, which will help you get acquainted with Outwit Hub in minutes.In this first guide, you will mostly learn the function of the main navigation and collection controls to be found in the Hub’s interface.
1. Install the Extension or the Standalone version
If you wish to use OutWit Hub as a Firefox add-on, you will first need to install Firefox.
To download it, click here.
After installing Firefox, you can download Outwit Hub by clicking here.
If you chose to use the standalone version, you just need to follow the install instructions and run the application.
If the installation isn’t performed automatically, find the downloaded .xpi file, open it with Firefox (or drag it to the Firefox window) and follow the instructions.
If you are using the standalone application, double-click on its icon, like for any other program.
For the add-on: after Firefox has reloaded, click on the OutWit Button ![]() in the tool bar.
in the tool bar.
If the icon is not visible, in the menu bar select Tools -> OutWit -> OutWit Hub

OutWit Hub will open with the Web page currently loaded in Firefox.
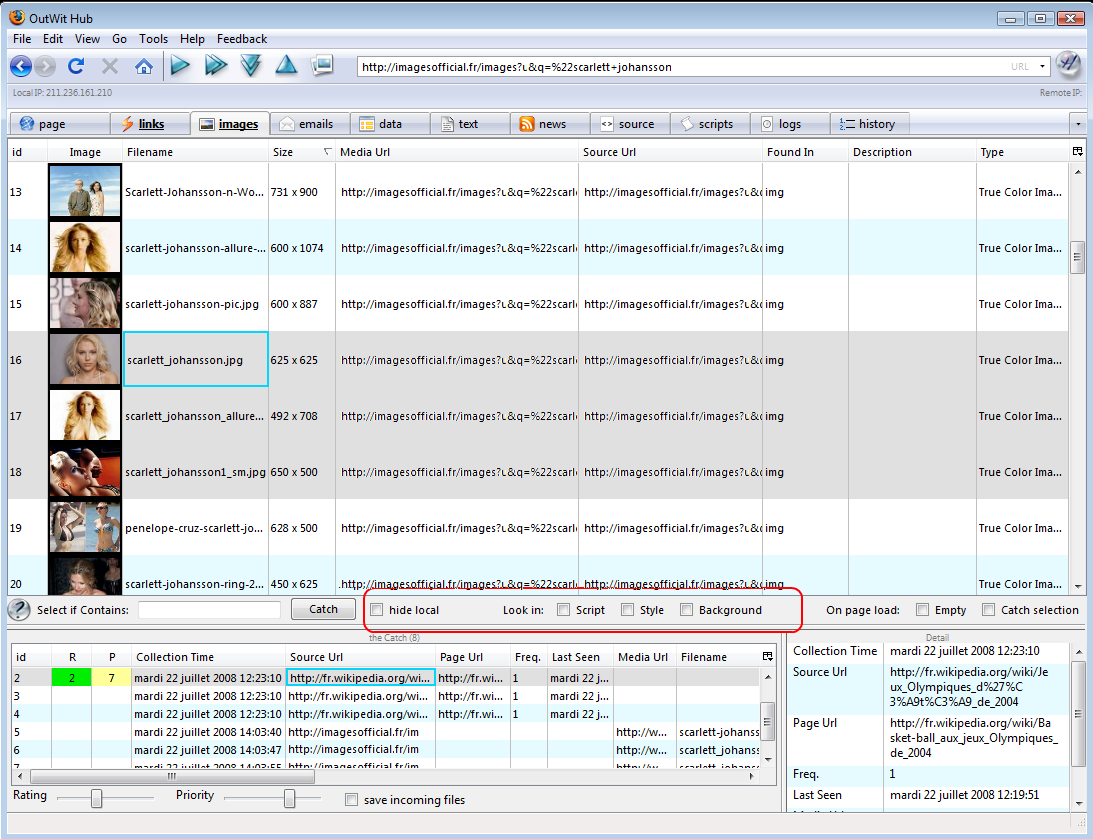
You are now in OutWit Hub. The first view on the left “Page” is the Web Page itself. All the other views are objects: links, images, data…that are found in this page.
The application is a browser that dissects the pages into data elements. On the first view “Page” you are on the Web, and in the others you see a filtered view of the current page you are visiting.

You only need to understand three simple concepts to use OutWit Hub:
- A shopping basket named the “Catch” is at your disposal at the bottom of the window to collect whatever you desire and it will follow you anywhere you surf.
- You can filter the information to see only the type of data you want and “catch” it into your basket.
- You can navigate automatically through large series of pages with just the click of a button and OutWit Hub will recognize and collect data for you.
3. Quick Overview on How to Navigate
 Address Bar: In which you will type URLs or search queries.
Receives either the URL to load as the current page or a query that will be forwarded to the preferred search engine.
Here are the main controls at your disposal:
The Views

![]() Page: The current Web page.
Page: The current Web page.
The ‘Page’ view is the Website. The current page is the one that is analyzed in the other views. (Which respectively show its images, links, emails, text, rss news links, and data that can be extracted from the page.)
![]() Images: Shows the list of all images on the current page.
Images: Shows the list of all images on the current page.
Displays a table of all the images found in the Web page currently displayed in the ‘Page’ view. Images can be filtered, sorted, and moved to the Catch. (more about this view: see related tutorials)
![]() Links: Shows the list of all the links contained in the current page.
Links: Shows the list of all the links contained in the current page.
Displays a table of all the links found in the Web page currently displayed in the ‘Page’ view. Links can be filtered and sorted to extract specific content and documents then moved to the Catch.
![]() Emails: Shows the list of all email addresses found in the current page.
Emails: Shows the list of all email addresses found in the current page.
Displays a table of all the email addresses found in the Web page currently displayed in the ‘Page’ view. Emails can be filtered, sorted and moved to the Catch or exported to a file.
![]() Text: Shows the text of the current page.
Text: Shows the text of the current page.
Displays the current page as simple text.
![]() News: Shows RSS news feeds from the current page.
News: Shows RSS news feeds from the current page.
Displays articles of all RSS feeds found in the page. The news can be filtered, sorted and moved to the Catch or exported.
![]() Data: Displays data extraction tools.
Data: Displays data extraction tools.
Gives access to the four extraction modes: tables, lists, guess and scraped.
These Appear as Views of Data:
![]() Tables: Extracts HTML table content.
Tables: Extracts HTML table content.
Analyzes the page and extracts the data contained in the HTML tables. Results are displayed in a table and can be filtered, sorted and moved to the Catch or exported.
![]() Lists: Extracts HTML list content.
Lists: Extracts HTML list content.
Analyzes the page and extracts the data contained in the HTML lists. Results are displayed in a table and can be filtered, sorted and moved to the Catch or exported.
![]() Guess: Attempts to guess the data structure and extract it.
Guess: Attempts to guess the data structure and extract it.
Analyzes the page and tries to infer the data structure from recurring strings, remarkable labels and the recognition of semantic units. Results are displayed in a table and can be filtered, sorted and moved to the Catch or exported.
![]() Scraped: Applies a previously loaded scraper to the page.
Scraped: Applies a previously loaded scraper to the page.
If a scraper was associated with the URL of the current page, it will be applied when clicking the “Scraped” view. Results are displayed in a table and can be filtered, sorted and moved to the Catch or exported.
![]() Scrapers: Shows the HTML source of the page.
Scrapers: Shows the HTML source of the page.
Displays the colorized source code of the current page emphasizing the text that is actually displayed on the page. Also contains the scraper editor where a data scraper can be defined for a specific URL.
Filter Controls

Hide Local: If you check this box, the view will only display the outgoing links or external images of the current Web page. Elements that are local to the Web page will be hidden.

Hide Cache: When this box is checked in “Links”, cache URLs are not displayed (a cache is a saved state of a Web page kept by a search engine).

Documents: When checked in “Links”, only URLs that correspond to documents: pdf, doc, xls, etc., are displayed.
Script: When this box is checked in the “Images” view, images used or cited in the HTML script tags are displayed, otherwise these will be hidden.

Style: Similar to the “Script” check box, this box, when checked, displays images used or cited in the styles.
Background: Similar to the two check boxes above, this box, when checked, displays the images used as background in the HTML code.
 Next in Series: Loads the next page in a series.
Active when your current page is part of a series, for ex: the result page for a query in a search engine that continues for multiple pages. OutWit Hubs finds a navigation link to the following page.
 Browse: Auto-Browses through all the pages of a series.
Active when your current page is part of a series, for ex: the result page for a query in a search engine that continues for multiple pages. The Hub will continue through the links until the end. To stop the navigation press escape or click the button a second time.
 Dig: Automatically explores all the links of the current page.
Active when OutWit finds links in the current page. Clicking on Dig displays a menu to set the depth of the dig. Depth = 0 will browse through all the links of the current page, Depth = 1 will also explore the all the links of pages visited. If the current page is part of a series, the dig will go on as long as a next page is found. Escape or a second click of the button will stop the dig.
 Site Home: Loads the home page of the current site.
Active when the current page is not the home page of a site. It goes to the top of the current site’s hierarchy.
 Slideshow: Displays the images of the page as a slide show.
Active when OutWit finds images in the current page. The slideshow can be viewed in full screen or in the “Page” view. If the current page is part of a series, the slide show will go on as long as a next page is found.
Scripts are not yet implemented in the current version. Logs and History implementations are still very basic but there is more to come….

At the bottom of the OutWit Hub window, is a widget called “the Catch.” If you do not see it, select “Catch” in the View list. If it is too small, bring your cursor to the splitter between the widget panel and the Catch; your cursor will become a two way-arrow, allowing you to resize it to your liking. The Catch will remain visible whichever View you select.
So, what’s the Catch?
Not to worry. It’s just a shopping basket you carry around while you surf. When you are using one of the views (pages, images, links, emails, data..), you may want to select some information to work on. The catch allows you to keep a personalized selection of items, sort them by priority, save them to an Excel spreadsheet, save the related images or files, etc.
![]()
For this, you only have to drag and drop the item(s) you want into the Catch or, (in any view other than “pages”) select the rows you want in any view and click on Catch.
You can also “catch” the selected rows by hitting the Return key

On the right, a resizable table shows the detail of the last item you clicked on: its collection time, URL address, sources, size, frequency…
Selecting Items to Send to the Catch

Save Incoming Files: When checked, if an item moved to the Catch contains a link to a file (image, documents..) this file will be saved to your hard disk.
![]()
Empty: When this box is checked, whenever you load a new page, the view’s content is deleted. Otherwise, the data is kept between page loads.
Catch Selection: When loading a new page, selected data will automatically be moved to the catch.
 Rating & Priority: Allows you to add a rating to selected rows in the Catch. This can be very useful if your catch contains a large quantity of items.
by jcc
Tags: Interface, Newbie, Outwit Hub, Overview, tutorial
October 18th, 2008 at 8:43 pm
First of all, AMAZING.
OK, my real issue:
The “Dig” feature: how do I get it to just get info from the following pages in the series?
The program does an excellent job of determining whether a page is in a series and what are the other pages in the series. However, it seems like that Dig feature will follow any link on the page rather than the other pages in the series.
Basically, I have a page that I’m scraping with the “Guess” feature. There are 20 pages in the series with it that are organized in exactly the same way. I would like some way to scrape all the pages at once using the guess feature, rather than having to visit each page individually and hit “Guess” and catch them.
Am I missing something here?
Thanks
December 1st, 2008 at 6:16 pm
You are absolutely correct that ‘Dig’ follows the links contained on the page. To browse through a series of pages you can use either ‘Next in Series’ (single arrow) or ‘Browse’ (double arrows) to navigate the through the pages in a series. The ‘Next in Series’ button will proceed to the next page in a series while the ‘Browse’ button will continue through each page until it reaches the end of a series. You can always reference our tutorial “Auto-Browsing Through a Series of Pages” at: http://blog.outwit.com/?p=46 for more tips.
December 30th, 2008 at 12:42 am
It seems this could be really useful, although my use is recreational. Not having any experience with a similar program or even need, it’s a bit confusing. I had difficulty even finding the tutorial to get started. When I clicked on the button to go to the “beginning tutorials”, the same page was opened. Seemed confusing to me. I hope I learn to use this program. I have been using pc’s since 1989, but there are so many programs going in so many different directions history doesn’t necessarily help. Thanks for a useful program.
January 26th, 2009 at 7:37 pm
nice clean interface, with easy to understand documentation. So sad about no scripting yet……. please let me know when added.
January 27th, 2009 at 12:09 pm
Nice work! I’ll have to do a cross post on this one 😉
February 2nd, 2009 at 2:13 pm
Thanks for the compliment!
February 3rd, 2009 at 1:22 pm
I have installed the Outwit without any problem. But it does not display any web page in the Firefox. I have the two DLL files in c:\windows\system32.
Help please. Thanks
February 3rd, 2009 at 2:33 pm
Please do the following to test if the files were installed properly:
Shortcut : windows + R
Then enter: regsvr32 c:\windows\system32\msvcr70.dll and afterwards regsvr32 c:\windows\system32\msvcp70.dll
You will receive a message telling you if the files were installed successfully or not. It is possible that the files are there but not being recognized by the system. If they are not recognized, you will need to reinstall msvcr70.dll and msvcp70.dll.
March 22nd, 2009 at 11:36 pm
This looks very good… I am still unable to do something, but perhaps I’m just clumsy with it.
Say there is a website with 15000 pages in the form of p1.html… p15000.html and in each page there is a table.
Is there a way to get all the 15000 tables in an automated fashion? I cannot imagine myself going page by page.
Best regards!
March 23rd, 2009 at 11:49 pm
On second thought, I was missing the point – it’s all there in “the catch”, one just has to wait long enough for the program to browse all pages.
March 26th, 2009 at 12:05 pm
You can also uncheck ‘Empty’ and the information taken from each page will remain in your View Panel. Then you can apply special filters before moving the information into your Catch.
April 17th, 2009 at 8:21 am
Nice to have tutorials, but there is no other “help” that I can find, neither from within the program or on the website. So what happens when the tutorial doesn’t match up with what you actually experience?
When I launch OW hub according to this tutorial, I do not see the screen that it says I should. I see the black background with the photo’s (and other links), and the photo’s that are in the cache. But there is no address bar, no navigation bar, and neither of the two panes shown below the (black) photo field.
I have looked through all the menus, and the options, but I can’t find anywhere that tells me why, or what to do about it.
Sounds like a great program, but the documentation seems to be lacking.
May 11th, 2009 at 7:06 pm
I’m rather computer savvy and I must say that I’m having considerable trouble getting this program to operate meaningfully.
As for a tutorial, I think you need to create a screencast-type tutorial with voice-over to show people exactly how to search for particular items. In my case, I’m searching for images.
The alternative to doing a “video” tutorial (as suggested above) would be to do a rather detailed step by step tutorial with screenshots illustrating. I can see you’ve done this to some extent, but I’m unable to follow your instructions (unfortunately). Seems like the UI could use some modification to make it more intuitive.
July 2nd, 2009 at 12:11 pm
Hi.
I am trying to learn how to use the ‘scraper’ facility… I have NO knowledge of HTML so am at a loss. Can someone explain how I use this facility to extract data such as address;email;phone;fax?
ANY help would be greatly appreciated. Otherwise I shall continue to fumble around in the twilight until OW publish more help guides….
September 17th, 2009 at 5:28 pm
[…] Launch OutWit Hub If you haven’t installed OutWit Hub yet, please refer to the Getting Started with OutWit Hub […]
October 8th, 2009 at 4:20 pm
Hi Cherrie,
I use the guess button to extract data. It works most of the time.
Emails button do a good job to retrieve email too.
Hope this helps
November 13th, 2009 at 6:54 am
I’m excited for this to include scripting. I have to grab data and pictures from a sister site daily which takes ALOT of time to do manually. I’ve been using the php scriptable browser which grabs me the data, just not the images. Once you’ve allowed scripting this will be a very powerful tool. Thanks for the hard work!
January 10th, 2012 at 7:57 pm
Hi,
I am using Firefox 9 w/an imac. I installed both files to run outwit docs, but I do not see Outwit in the drop down menu under tools. Any suggestions how to get this working?
Thanks
January 10th, 2012 at 8:11 pm
Tony, the install went wrong for some reason and the Firefox add-on panel should tell you what is installed and what is not. In any case, as it says in the comment form, please do not use this blog for support. Instead, it would be nice if you could create a ticket using the support system on outwit.com
November 21st, 2012 at 3:40 pm
thanks for this tool it worked perfectly and helped me… when I badly needed